Simon Clement

About Simon Clement

This author has not yet filled in any details.
So far Simon Clement has created 100 blog entries.

November 2016

Tessera 401

2016-11-12T21:38:24+11:00

New Features

Creating New Artworks

New artwork’s screen now includes a comprehensive list of fields for data entry including custom fields. Up to three images can now be added when creating a new artwork. Extended range of custom fields available on this screen as well.

Importing folder of images

Individual artworks now allow the import of a folder of images

Navigations Aid

The navigation board now includes access to one-click access to each View available in each component.

Corrections

  • Creating new client from Client List screen now works as expected
  • Invoice design now correctly reflects changes to field headings on printed invoice
  • Attaching documents to artworks now allows the attachment of any document

other minor alterations to ensure Tessera works as expected.

Tessera 401 2016-11-12T21:38:24+11:00

October 2016

Try the Omit button

2017-04-20T13:13:37+10:00

There’s nothing mysterious about the Omit button. It simply shows the artworks that are not being shown, or omitted, from the artworks being browsed. Let’s say you have 7 artworks and have conducted a search so that you are now viewing only 5 of these artworks. The Navigation bar will show (A) that you are viewing 5 records and that (B) there are a total of 7 artworks available.

Use the (C) Omit button and you are now viewing the 2 artworks that were omitted and the 5 initial Artworks you found are omitted instead. Click the Omit button again to toggle between these sets. This is useful to find artworks that do not belong to your search criteria. For example: Search for artworks that belong to the artworks medium of “Oil”, click the Omit button, and you are now viewing all artworks that are not marked as having an artwork medium of “Oil”.

Use the Show All button (E) at any time to revert to viewing all Artworks.

tessera-4

tessera-6

Try the Omit button 2017-04-20T13:13:37+10:00

Hiding sold artworks

2017-04-20T13:13:46+10:00

When browsing artworks in Tessera you’ll usually be interested in viewing artworks that are available. But when you’ve conducted a search you’ll often be left looking at a screen like the one below where there are a mixture of sold and in-stock artworks. (Where there is no stock available the Info Button will always be displayed in red instead of green).

To temporarily hide out of stock artworks use the “Hide Sold Artworks”. Now you can use the Omit button to toggle the view between sold and unsold artworks.

List view

Hiding sold artworks 2017-04-20T13:13:46+10:00

Browse Stock and Sales

2018-04-18T12:36:58+10:00

Review Stock and Sales

  1. Use Browse Stock and Sales to gain an overview of current sales and stock

Basic details

  1. Select to review either sales or stock
  2. Filter the complete lists of artists
  3. Print a basic report but use the dedicated Stock or Sales Report screens for more detailed results.
  4. Use the Reveal Totals… button to show total
  5. Select an individual artist to reveal individual artist details (Once reviewing an individual artist’s works select an individual artwork to review details).

Individual details for an artist’s stock

  1. On this screen you can review details of the stock and sales for the selected artwork.

Browse Stock and Sales 2018-04-18T12:36:58+10:00

August 2016

Import Artworks

2017-04-20T13:13:54+10:00

Import People records into Tessera before attempting to import artwork records as Artworks depend on finding and linking to the appropriate artists and owner records in the People Component..

Artist Names and how to speed up the time taken selecting artists.

This is useful if you are importing a large number of artworks with many different artists. If you are a single artist importing a collection of artworks all created by yourself this will not be of use.

When you import artwork data into the Artwork section Tessera will use the name you import into the Artist Last Name field and will attempt to match it with a record that has the same information in the Last Name field of a record you’ve already imported into the People Component of Tessera for those records where the person is marked as an artist.

If the import into an artwork record’s Artist Last Name = Last Name of an entry the People Component, where that record is marked as an artist, then Tessera will lookup and enter the correct artist name for you which will save you time where large imports are being made.

(Note: Tessera only looks for this link at this point of the import. Once your data is imported serial numbers are used and you can safely alter artist names with no effect on how Tessera works).

Things to consider when attempting to match artist entries

    1. There has to be an exact match between the Artist Last Name in the artwork import and the Last Name in the People record.
    2. Tessera ignores case. eg. Sortern will match sorteRn or sorteRn.
    3. Even if a surname is unique Tessera will not make a match if the record in the People component of Tessera is not marked as an artist.
    4. Tessera ignores spaces before or after names.
    5. Check the entries in the People Component marked as artists and ensure the last names are displayed as expected before importing artworks.
    6. If you have two artists with the same Last Name then you will need to adjust these the import page details manually.

Custom Fields

Tessera features the ability to add virtually an unlimited number of custom fields to store data within Tessera. On import there are ten of these custom fields available. Once you’ve imported data into these fields you’ll have the chance to specify what these fields are for before committing them to Tessera.

Fields available for import

This is a list of the names of the fields into which you can import data.

These fields are all text fields apart from the Artwork Retail PriceArtwork Purchase Price and Artwork Inventory Price fields which are numbers and the Image field which is a container designed to hold images. Image records can only be imported if you are importing from a FileMaker Pro file. (Alternatively there is an “Import images from a folder” feature which lets you import a folder of images after which you can add the artwork details.)

Artist Last Name, The last name of the artist

Artwork Title, The artwork title only

Artwork Dated, This can be a single date or an approximate date for historical artworks

Artwork Category, “Painting”, “Sculpture” or any other values you want to use to categorise artworks

Artwork Medium, “Oil on canvas”, “Mixed media” etc

Artwork ID, An unique identifier for your artwork

Artwork Other ID, The ID an artist may have already given to this artwork

Artwork Retail Price, The price for which the artwork will sell

Artwork Purchase Price, The amount you purchased this artwork for (useful for galleries and collectors)

Artwork Purchase Date, Format dates as 30/12/2014

Artwork Dimensions, Use any format suitable for your needs

Frame Dimensions, For consistency use similar formatting to general artwork dimensions

Location of Artwork, “Stockroom”, “Studio” useful for running inventory reports

Inscriptions, Where and when artwork signed. (“Signed and dated on reverse”)

Provenance, The history of the artwork

Literature, Reference in publications for this artwork

Collection Details, Are you recording details of an artwork that belongs to a collection?

Artwork Source Details, For galleries to collectors of historical works from where was this artwork sourced?

Image, The image for this artwork. (Note images can only be imported from another FileMaker file or directly either one by one or as a folder of images without accompanying text.

Image Name, Have you a spreadsheet full of artwork details and an accompanying folder of artwork image? Use the Image name field to record the name of the image. This way during the import process this will make it easier to find and enter the relevant image.

Custom 01, Tessera can hold any number of custom fields for holding other data use these fields for that data and once you’ve imported the records you can specify the names of the fields.

Custom 02

Custom 03

Custom 04

Custom 05

Custom 06

Custom 07

Custom 08

Custom 09

Custom 10

Pre-formated Excel spreadsheet

TIP: Are you a gallery regularly having artists sending you in artworks? Help speed the process by encouraging artists to download the spreadsheet and enter the data into the required fields. You won’t need all of the cells filled so specify in your email what you do require. The spreadsheet includes a column where the artist can enter the name of the image associated with the artwork. That way if they send you the images as well you’ll find it easy to locate and enter the correct image during the import process. To simplify life simply ask your artists to provide a spreadsheet with: The name of the artwork, the quantity and the retail price. Once this is imported the import features in Tessera will allow you to fill other fields rapidly.

NewImage

You can download a pre-formated Excel Worksheet for importing artworks here. The pre-formatted Worksheet doesn’t include a column for images, which aren’t usually stored in a spreadsheet, but does include the Image Name column to help you find and insert relevant images during the import process. 

Import text data from a wide range of sources. (See FileMaker Pro support page on this topic)

Access the import feature from the home screen.

NewImage

Import Features available

  1. Use this button to find artworks in a spreadsheet or in a text file to import. Common file formats used to import data into Tessera include .csv, .txt, .tab and .xlsx files from Excel.
  2. If you have a folder of artwork images then use this button to import them in one step you can then add text details before committing the data to Tessera.
  3. Use this button to display and print the fields accessible for import and access a feature that allows download of a pre-formatted spreadsheet.

NewImage

Find data to import

Use the Find records to import… button to find and select your spreadsheet or other import file.

NewImage

Matching Fields

  1. You’ll be presented with a dialog box where you can drag fields to match them to their Tessera counterpart.
  2. Finally use the import button.

NewImage

Check Import

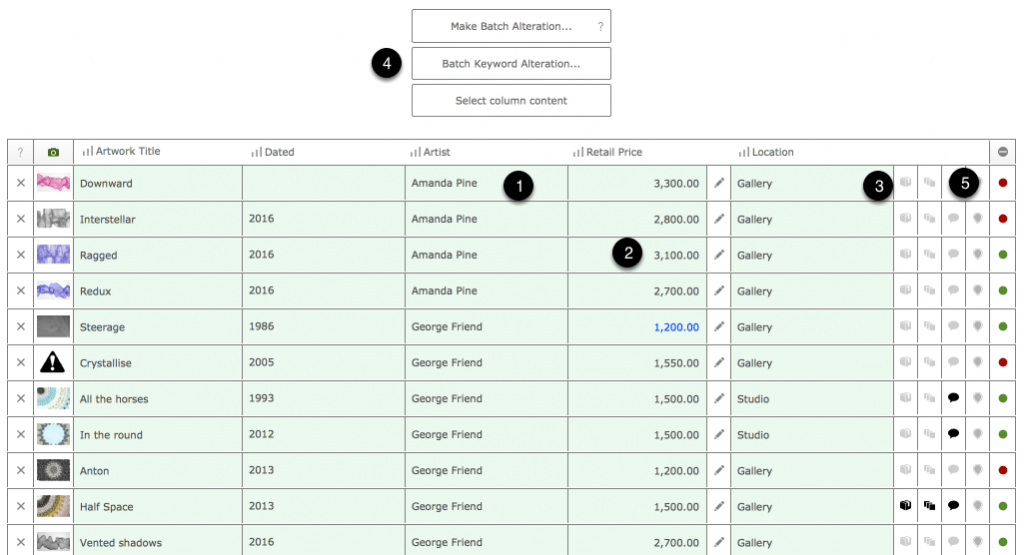
    1. Once imported use the Read these instructions… button to familiarise yourself with the features available.
    2. In particular learn how the Batch button works. This allows you to amend one field then see that same entry propagate throughout all other records which will help speed entry as well as ensuring accuracy. (You can amend fields once they’ve been imported into Tessera but the Batch button is only available with this range of functionality on this screen). For example: Amend one record on this screen so that the “Medium” field contains “Oil on canvas”. Now use the Batch button adjacent to this field and ALL records will contain the same value in the same field.

NewImage

Other features available on the import screen

    1. Speed data entry by making use of these drop-down menu editing buttons that let you add entries to the list that appears when you tab into fields.
    2. Use this button for more details on entering artists. (See the section on entering people to Tessera to gain an understanding of how you can make the job of entering artists both easier and quicker).
    3. If you’ve imported data into any of the Custom fields then you will need to select an entry from the corresponding Custom field Name field. If there isn’t a Custom field Name that matches your requirements then use the feature found via the Help with custom fields button to add the fields you require. Failing to specify a name for the Custom field will result in the custom field data not being imported.
    4. Specify an ID for each artwork. (Tessera may not permit duplicate artwork IDs and duplicates will be appended with the word “COPY” on committing the import if you have disallowed artworks to have the same ID in Tessera’s Preferencest. If you have specified a serial number default in Preferences then this will be used with each new artwork incremented by a value of 1 meaning you have no need to enter an artwork ID on this screen. Any ID entered on the import screen will take precedence over the default set in Preferences. Artwork IDs can be amended at any time).

NewImage

Commit the artworks to Tessera

Once you’re happy with the records use the Commit button and the data will be moved into Tessera.

Making corrections

What happens when you commit 1,000s of records to Tessera and then discover there’s an error in every record? Use the Artwork advanced search feature to find all of the last imported records then use the Tools button >  Delete Button > More feature to delete all of the imported records.

  1.  Find the last records imported by using the button found under the Artworks advanced search screen.
See the Import People help page for more details on locating and deleting the last set of imported records.

NewImage

Import Artworks 2017-04-20T13:13:54+10:00

March 2016

Tessera 400

2016-03-02T04:53:25+11:00

Changes to Tessera and Tessera Pro

Tessera now no longer includes the ability to create invoices although artworks can still be mark as sold and linked to the purchasing client. This has allowed a new price point for Tessera. For those purchasers of Tessera prior to this version they will now be automatically updated to a Tessera Pro licence.

New Features in Tessera 400

  • New interface design
  • Additional field for recording date that artworks are consigned into Tessera
  • Addition to the Artwork ID field
  • Important: Changes to recording artworks that belong to an edition

CHANGES TO NAMES OF PRICE FIELDS

“Purchase Price” now “Inventory Price”

“Wholesale Price” in Version 400 is now “Purchase Price”

With Version 309 of Tessera the Purchase Price field has been renamed as the Inventory Price the price entered when adding stock has been renamed from Wholesale Price to Purchase Price.

These changes are simply to help in comprehension and to avoid ambiguity and make no alteration to the underlying purpose or function of these fields.

PRICE fieldS NOW AVAILABLE

Retail Price: Amended over time as you adjust price levels for artworks. Changes are automatically written to the retail price log.

Inventory Price: Likely to start off as the same amount as the Purchase Price but as the value of the artwork increases over time should be amended so that inventory reports accurately reflect the true value of your inventory.

Purchase Price: For artworks you purchase outright, which is likely to be relevant for Collectors and Galleris but not so for artist’s who use Tessera to manage their output, this entry will remain fixed for each stock entry you make.

New interface Elements

Tessera has been redesigned with an emphasis of clean simple graphics and reducing colour where possible to remove as much distraction from the artworks.

Consignment

When marking artworks as consigned in, you now have the option of including the date the artwork was consigned to you.

Artwork ID

There is now a second ID field. Often artists have their own ID system which they prefer to refer to when identifying artworks. For galleries or collectors it’s useful to include this ID along with your own ID for reference purposes.

Changes to artworks belonging to an edition.

Artists and galleries often have a number of artworks in an edition. These are unique artworks in a series that are often numbered in the format 1/5, 2/5 etc. These are usually prints or photographs but could also be a series of sculptures from the same casting.

Any artwork that belongs to an edition even if you hold a single item requires the Edition Checkbox to be checked. Importing your data into Tessera 400 from 309 will automatically make this alteration where possible. Keep an existing copy of Tessera 308 for references purposes to confirm this alteration has been made as expected.

Placing Editions out on Consignment

When placing artworks that belong to an edition out on consignment you now explicitly attach specific members of the edition to the consignment. You now have an unambiguous record of not only the artworks sent out on consignment but also the specific editions of that artwork. Editions out on consignment will be marked as such and you will not be able to sell or delete an edition marked out on Consignment until you detach it from the Consignment Document. This helps prevent inadvertent sales of artworks that are not currently available.

  1. When adding the quantity of an artwork attached to a consignment document you will be prompted to add the individual artworks you want to include.
  2. The edition numbers will be displayed here and you can copy and paste these into the description of the item meaning the printed consignment document will clearly show the artworks and the relevant edition numbers.

Managing Editions from the Artwork Edit Screen

  1. Select the Edition Details button on the Artwork Edit Screen
  2. The available editions will now display those artworks available, sold and out on consignment.

Managing Editions from the Artwork Stock Screen

  1. Artworks placed on consignment are now indicated as well as artworks sold. Use the adjacent buttons for more details and for the option to edit the related sale or Consignment Document.
  2. Totals now include the number of artworks out on consignment.
  3. The Printed option allows you to record those members of an edition that have yet to be created.
Tessera 400 2016-03-02T04:53:25+11:00

November 2015

Artworks – General Features

2018-07-16T15:00:00+10:00

The Artwork Component is where artwork details are entered and stored.

Each record represents an artwork.

An artwork can have a stock level of zero, one or more than one.

If you sell jewellery or multiple editions of an artwork or any item where you have many copies then the artwork is entered once and the stock level can be added to where required. See the section on the unique stock tracker  for more details on how to manage artworks where each stock entry has an additional unique value such as an edition number.

For collectors and galleries it’s likely there will only be one item per artwork. For artist and shops using Tessera there may well be many pieces for each artwork.

  1. Edit Screen where all fields are available and most editing is performed. The Edit Screen is divided into several panels of information which is explained in more detail below.
  2. Form View. Here artworks are presented one at a time with an emphasis on highlighting the image.
  3. LIST screen more than one artwork viewable at a time..
  4. List Screen allowing more artworks to be viewed at one time.
  5. Grid Screen where artworks are presented in a grid format.
  6. Batch Screen. Here you can specify what fields are available to view allowing the ability to scroll through artworks and make quick edits.


EDIT SCREEN

Add and edit artwork details. All fields are included on this layout, with access to additional fields via buttons and popover screens. See the help files on the individual fields available on these screens for more details.

  1. Click on an artwork to reveal details on the panel on the right-hand side.
  2. Use this button to temporarily hide the price on this screen.
  3. Use this button to select whether or not artworks with no stock are displayed in this column.
  4. Select an artist from this list to preview their artworks.

OTHER SCREENS IN ARTWORKS

Batch Screen

  1. On this screen you can elect from the drop-down menus to select exactly what details you want to appear in each column. Columns can be sorted and individual fields can be edited.
  2. Some fields will feature an edit button that gives you access to more details.
  3. Use the series of icons to access more features for individual artworks.
  4. There will be occasions when you want to make alterations to a number of fields at once. For example you might want to alter the Medium of a number of artworks from “Oil” to “Oil on canvas” at once. Rather than having to individually changed dozens of records, alter one record then use the Batch feature to change the value in all of the records in the current found set. Alterations made in this way cannot be undone. Use the Batch Keyword Alteration button to add or remove a specified keyword to a number of artworks at once.
  5. Tap the stock level icon to reveal sales and stock numbers.

Form Screen

This screen shows you one artwork at a time and is useful when showing artworks to clients. Click on the image to reveal more details.

  1. Use the Full Screen button to view the image alone with the option to switch the background colour between black and white.
  2. Control the text that appears next to the image.
NewImage

LIST screen

View several artworks at a time in list format.

    1. Use the Preferences button to specify the data to be placed in the last field location on this layout.
    2. Click on images for more details and features.
    3. Use the “Hide Sold” button to temporarily hide artworks that have no stock available.

NewImage

List Screen

View many artworks at a time in list format.

  1. Click on column headers to sort artworks.
  2. Sorting columns where the title is in bold will summarise data as shown below.

NewImage

Grid Screen

View many artworks in a format designed to highlight images use the Preferences to specify the details to appear under images.

Artworks – General Features 2018-07-16T15:00:00+10:00

May 2015

The Tessera Screen

2017-03-31T11:23:26+11:00

The Tessera Screen you see when you open Tessera and can be accessed from most areas using the Tessera Logo found in the top left hand corner of the screen. From here you have access to all the components of Tessera. This is also the screen from where reports can be run, upgrades to Tessera become available and where other essential features are found.

Features on the Tessera Screen

  1. When new versions become available this update message will appear. (You can check for the most current version of Tessera at any time by clicking on the Check for updates button). More details on updating Tessera…
  2. Register Tessera and review registration details.
  3. If there are comments requiring attention this message will be highlighted in red. More details…
  4. The three main components of Tessera, Artworks, People and Sales are accessed from here.
  5. The Tessera Reports screen. More details…
  6. Tessera Preferences for all Components. More details…
  7. Collections allow you to group artworks together for quick access. More details…
  8. Use this button to access a wide range of help features including the Tessera Tutorial and the online help files.

Tessera Screen continued

  1. Artworks can be consigned into and out of Tessera. Use this button to manage artworks consigned out from Tessera.
  2. Backups are crucial to preserve your Tessera data. This feature allows a quick and easy way to backup your data file but should not be considered a substitute for a regular comprehensive, off-site backup routine.
  3. Manage Users lets you set up users and security for your copy of Tessera. See Preferences for details on how to apply a password to protect the opening of Tessera.
  4. Data can be exported from Tessera from the Artworks, People and Sales Components. Use this button to export all data from all components.
  5. Data can be imported into the Artworks and People Components and this is where, for new copies of Tessera, you will import your data from an existing copy.
  6. Browse Stock and Sales Use this feature for an overview of all sales and stock. (Use the dedicated Sales and Stock Report for detailed results).

The Tessera Screen 2017-03-31T11:23:26+11:00

April 2015

Version 308 New Features

2015-04-22T07:08:43+10:00

Amendments to existing features to ensure they work as expected

  1. Invoice design has been amended so there is more space for Header and Payment terms and the totals on an invoice will slide up to meet the last item on an invoice and will appear on the second or subsequent pages where required.
  2. Templates now will return the expected result when printed.
  3. More Consignment options are available see more details in the Tessera Help Files.
  4. Tessera help files have been extended and videos are now incorporated into the main help pages.

New Features in 308 

New Navigation

    1. The previous way to move between Views has been altered. There is now a horizontal menu at the top of every component that lets users move directly to the layout of their choice and see at a glance which layout is being accessed.

NewImage

Keyboard Shortcuts

For Desktop users only:

Cmd + Arrow-Key Up moves you to the previous record for those Views where the manual record keys are available in the top right-hand corner of the screen.

Cmd + Arrow-Key Down moves you to the next record for those Views where the manual record keys are available in the top right-hand corner of the screen.

Cmd + Option (At) + Arrow-Key Up moves you to the first record for those Views where the manual record keys are available in the top right-hand corner of the screen.

Cmd + Option (At) + Arrow-Key Up moves you to the last record for those Views where the manual record keys are available in the top right-hand corner of the screen.

Cmd + ‘ Inserts from Last Record: Only available on the Artwork Edit List View this allows you to place into a field the last value from the last record visited. Example. You just moved from the Medium field in one row where the value is “Oil on canvas” to the next row and your cursor is again in the Medium field. Use this keyboard shortcut and the Medium field will now contain “Oil on canvas” as well. This speeds data-entry for this View.

New Artwork View

  1. Select using the column headers which fields you want to appear where.
  2. Buttons adjacent to fields give more details and features
  3. Use this feature to change the value in all the records being browsed for a nominated field. For example: Change all values in the Medium field for all records being browsed. Use the adjacent help button for more details.

NewImage

Batch Alterations

  1. On the Artwork Edit List View Screen the option to alter the value in a single field over many records is now available

Example: You’ve found fifty records where you want the Medium field to show “Oil on canvas”.

  • Find the records you want to alter.Enter “Oil on canvas” into one of the available record’s Medium field.
  • Leaving the cursor in the Medium field click on the “Batch Alteration…” button.
  • Now all fifty records will all contain “Oil on canvas” in the Medium field.

Caution: Batch Alterations cannot be undone.

NewImage

Frame details and other Artwork Edit Screen alterations

  1. Additional frame information is now accessed via the Details button.
  2. More space for viewing Category, Medium and Location details

NewImage

Allow Duplicate Artwork IDs

  1. You can now allow duplicate IDs for artworks. Artworks that have a duplicate ID will be highlighted and a button will appear that will give you access to a popover that will show the other related artworks.

NewImage

More details available on the Artwork Edit Screen

  1. The All buttons will display all other artworks that carry the same details in the adjacent field. Example: If the Medium field contains “Oil on Canvas” then the popover will display All artworks with “Oil on Canvas” in the Medium field. This is a quick and easy way to review related artworks.

NewImage

Payments Made

  1. Feedback is now available on the Artwork Edit Screen and the Stock and Sales screen giving you details on payments made against the current artwork. A gallery can see from the Artwork Edit Screen if they have made payments to an artist or other party who was due to be paid an amount on sale of the artwork. If the gallery sells multiples of artworks then the amount shown will be the cumulative amount paid and reviewing the artwork on the related Stock screen will list every payment with the option to move to the related Payment Document.

NewImage

Managing Collections

  1. Clicking into the Collections field on the Artwork Edit Screen now brings up a popover screen where artworks can be added to or removed from collections. 
  2.  The Collections Manager is still available from the Home Screen and can be accessed from this screen as well.
  3. Catalogue numbers can also be applied from here.
Using the “Info” button on any other Artwork Screen brings up a panel that also includes this collection feature allowing users to edit collections from most screens.

NewImage

Managing Multiple Editions

  1. The edition feature has been amended so users can add any number of individually numbered editions to an artwork either when a new artwork is created or from the Artwork Edit screen. When artworks are sold the user can select a specific edition to sell and can review at a later date from the artwork’s stock screen which editing have sold and to whom.

NewImage

Managing Amounts Payable

  1. When it comes time to pay third parties amounts on the sale of artworks Tessera now includes the ability to offset amounts payable with disbursement costs such as framing and promotional costs.

NewImage

Version 308 New Features 2015-04-22T07:08:43+10:00

Version 307 New Features

2015-04-21T09:24:12+10:00

NEW FEATURES FOR TESSERA VERSION 307. APRIL 2015

New Stock and Sales interface

View all your stock and sales on one screen. Drill down to view stock by individual artist and individual artwork. Tap the available artwork and invoice buttons to view details on artworks and invoices. From the screen of any artwork use the “i” info button to access relevant stock and sales screens.

NewImage

Better artwork tagging

Want to tag a number of artworks a client’s shown interest in? All screens in artworks now feature tagging where you specify the person and get feedback straight away as to the other artworks the current person is interested in as well as anyone who has expressed an interest.

NewImage

More “i” Info Button details

Tapping the info “i” button on an artwork now shows more details as well as giving you access to all other artworks by the current artist. Need to visit the Edit screen is much reduced as most details are always going to be at your finger-tips.

NewImage

Edit the Artwork Form View

Most often used to display artworks to interested clients the Artwork Form View, where one artwork is viewed at a time, now features the ability to edit the text details that accompany an image. You can select to have the image appear on it’s own or select from the drop-down menus and tailor the screen to fit your requirements.

NewImage

Extended integration of Custom fields

Custom field allow you to add any number of user specified fields to Tessera. Now the integration of custom fields is more widespread. When it comes time to export data or select what details are included in a report you can specify custom fields by name. When searching for artworks you can select a custom field to search on by name improving seed and accuracy of searches.

All button

Many fields on the Artwork Edit screen feature “All” buttons that reveal all related artworks.

NewImage

General Improvements

As usual ongoing improvements in performance and usability remain our priority and every release includes dozens of minor tweaks and improvements to allow you to get the most from Tessera.

Version 307 New Features 2015-04-21T09:24:12+10:00