Simon Clement

About Simon Clement

This author has not yet filled in any details.
So far Simon Clement has created 100 blog entries.

April 2015

Consigning artworks INTO Tessera

2018-04-12T16:34:24+10:00

See also: Consigning Artworks out of Tessera

Galleries, studios, museums and collectors will from time to time have one or more artworks consigned to them. These artworks remain the property of the consigning owner and are placed with you for a temporary period only. Most often this will be a collection of artworks from an artist placed with a gallery for sale.

The gallery will be responsible for stock keeping and managing these artworks until such time as they are placed back with the artist or removed from the consignment if they have been sold.

They are included in stock reports and are considered as part of your stock.

Marking an artwork as having been consigned into Tessera

  1. When a new artwork is created use this checkbox to mark this artwork as having been consigned into Tessera by the owner. Tessera expects an owner to be entered for consigned artworks and you’ll receive a warning if this is not the case. Existing artworks entries can be marked as consigned into Tessera from the Artwork Edit Screen at any time. All stock associated with the marked artwork is considered consigned into Tessera.
  2. Also specify the date you received the artwork

Reviewing consigned artwork settings

  1. Consignement settings can be modified on the Artwork Edit Screen.
  2. Consignment settings also appear on the Artwork Dashboard.

Other places to review artworks consigned into Tessera

  1. From the home screen use the Manage Consignments button to access the Consignment Access Screen.

  1. Once on the Consignment Access Screen use the Review Artworks Consigned IN button to review all artworks consigned into Tessera.

The Consignment Screen

  1. All artworks consigned into Tessera are listed here.
  2. Click on Artwork Title to alter an artwork’s consignment status.
  3. Filter the artworks displayed by owner and use the View these artworks… button to return to the artwork component and review the found artworks only. You can then select to print or export these artworks.

Other places you can review artworks consigned into Tessera

  1. From the People Component of Tessera select to view the Consigned In tab to review all artworks consigned into Tessera by the selected artist/owner.

Stock Report and Consigned in Artworks

  1. Use the Stock Report and conduct a search for all artworks owned by the owner who consigned the artworks into Tessera. Use the setting that will restrict the report to just artworks marked as consigned into Tessera.
  2. Use the filters to narrow the range of consigned artworks being displayed.

Searching for Consigned In Artworks

  1. Use the Advanced Search Function in Artworks
  2. Select Other Searches
  3. Select the Consigned In search button to view all artworks consigned into Tessera.


Consigning artworks INTO Tessera 2018-04-12T16:34:24+10:00

Tracker

2018-04-12T14:48:20+10:00

The Artwork Tracker

The Unique Stock Tracker or “Tracker” allows individual items of stock that belong to a single artwork to have unique identifiers such as edition numbers or print sizes. It also allows artworks to be placed out on consignment from Tessera.

The Tracker is a feature that can be turned on or off for individual artworks. There is a setting in Preferences that allows setting a default for the Tracker.

There are some occasions where it’s useful to turn the Tracker off.

For most users most of the time it is recommended to leave the Tracker on.

The Tracker can be toggled on and off from the Artwork Edit screen or from the new artwork screen when a new artwork is being created.

The Tracker cannot be enabled once artworks have been sold or consigned out or if a stock line entry has a value more than 1.

Most often you will be using the Tracker features to deal with artworks with a number of stock entries that have individual unique edition numbers but Tessera can just as easily manage multiple prints of a photograph where there are different features such as print size and print price.

Tracker Basics

Artists and galleries often have many artworks from the same edition and will want to manage these artworks without resorting to entering a new artwork for each edition. Tessera lets you create a single artwork, specify the amount of items in the edition, then ascribe unique features to each item.

Each item of stock is entered as a new stock entry where the quantity can either be set to 1 or 0. Stock entries when the Tracker is on cannot have a quantity greater than 1. (Use 0 where artworks have been destroyed or removed from stock for other reasons).

If you have five editions of an artwork then five separate stock line entries would be made for the artwork. Each of these stock entries will carry the edition number meaning you can track each individual edition as it’s entered in stock, sold or placed out on consignment.

Most of the time the Tracker should be on.

With the Tracker on the main artwork details are entered once then a multiple number of stock items can be entered each of which can have unique features. This is also suitable for artworks that only have one item of stock and because the Artwork Tracker allows additional functions it’s recommended to leave the Tracker on where possible.

When should the Tracker be on?

  • When there are items of stock that have unique features. Note if you are entering an artwork with a single edition number then you need to have the Tracker on in order to enter an edition number.
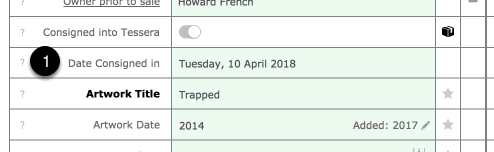
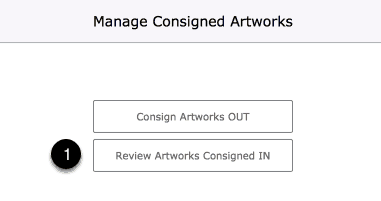
  • If you’ll be consigning this artwork out on a consignment document. Only artworks with the Tracker on can be placed out on consignment.

Are you a collector artist or gallery selling single, unique items of artwork? Although not essential it’s recommended to leave the Tracker on as it allows you to consign artworks out from Tessera.

When should the Tracker be off?

  • When you’re selling an item that has many items of stock that are identical. e.g catalogues or printed cards. Or items such as ceramics where you have many items of stock all of which are the same.

Tracker Usage Example 01

You’re selling an print of which you have ten identical copies and when one of these prints are sold it’s not important which item sold.

With Tracker OFF

One stock line entry is made with a quantity of 10.

When you sell a print you enter the quantity sold but you don’t select a specific print to sell.

Tracker Setting Example 02

You’re selling a print of which you have 10 copies each of which has unique identifiable features. (In this case an edition number).

With Tracker ON

Ten separate stock line entries are made.

  • Quantity 1. Edition  number: 1/10
  • Quantity 1. Edition number 2/10
  • Quantity 1. Edition number 310
  • Quantity 1. Edition number 4/10
  • Quantity 1. Edition number 5/10
  • Quantity 1. Edition number 6/10
  • Quantity 1. Edition number 7/10
  • Quantity 1. Edition number 8/10
  • Quantity 1. Edition number 9/10
  • Quantity 1. Edition number 10/10

When you sell this artwork you can select which edition number is sold and Tessera will track to whom it was sold.

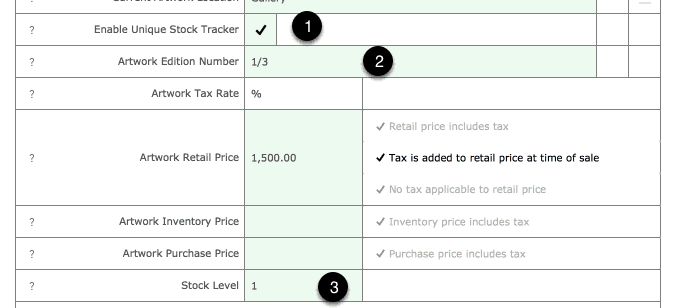
You can turn the Tracker on or off when creating a new artwork

  1. On the New Artwork Screen: Check this checkbox if this artwork requires Artwork Tracker features, even if you have just a single edition of an artwork. Use Artwork Preferences to select if Tracker is automatically to be set to on or off for new artworks. It’s recommended that the Tracker should be set to be on in most cases.
  2. If this is an edition then enter the first edition number for the editions you hold or the single edition number available if this is a single artwork. (Use “/“ as a divider). When the artwork is created Tessera will create the required stock line entries and will use this information to correctly enter edition numbers if they have been provided. If you have non-consecutive edition numbering or this is not an edition then leave this field empty and add details after the artwork has been created.
  3. Enter the total number of artworks you’re entering into Tessera.


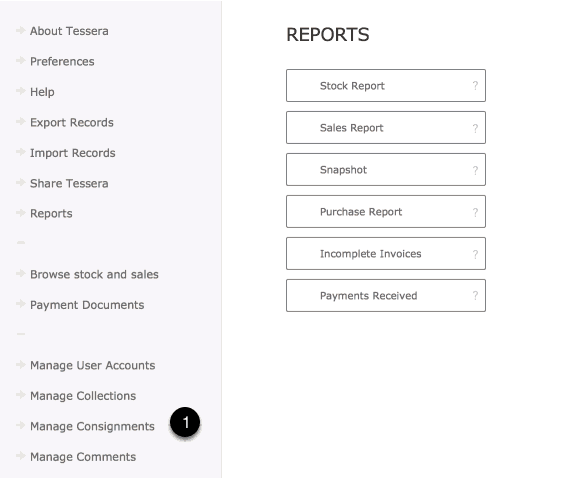
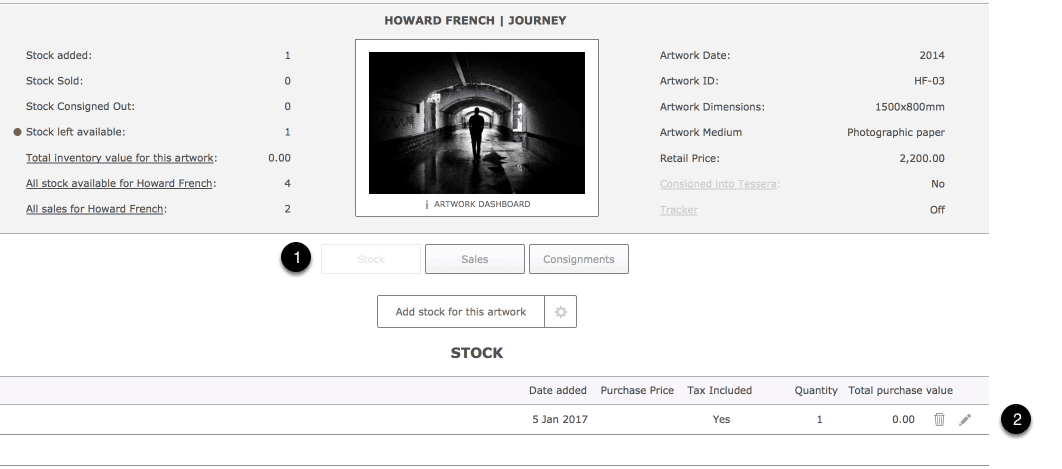
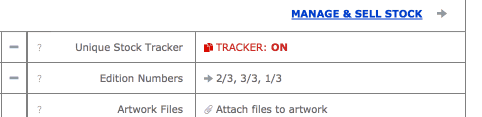
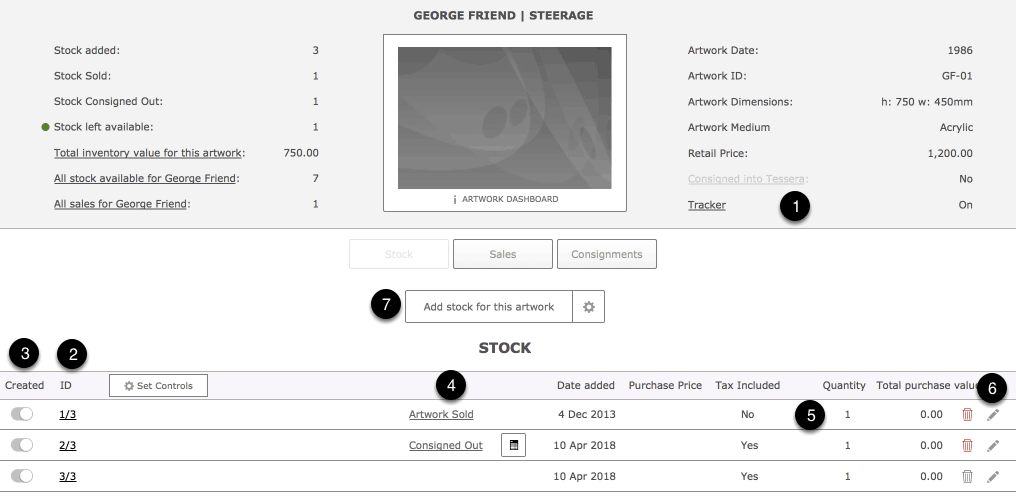
Managing Tracked Artworks from the Stock Screen

For more details on managing sets of artworks.

  1. Tracker status indicated here.
  2. Artworks with Tracker on feature this column where edition numbers can be entered.
  3. Unique stock items include a Created column allowing artists to mark individual items, sculptures or printed editions, as to whether or not they have been created.
  4. Items that have been sold or attached to consignment documents will be indicated as such and clicking on the underlined text will reveal more details.
  5. Unlike regular stock entries edition stock entries can only have a stock level of one or zero. (Zero for occasions where an artwork edition has been lost or destroyed).
  6. Access the stock details screen to adjust details such as purchase price.
  7. Use the Add Stock button to be prompted for the number of items you want to add and the edition numbers if required. Tessera adds a single line item for each entry which allows edition entries to have unique edition numbers.

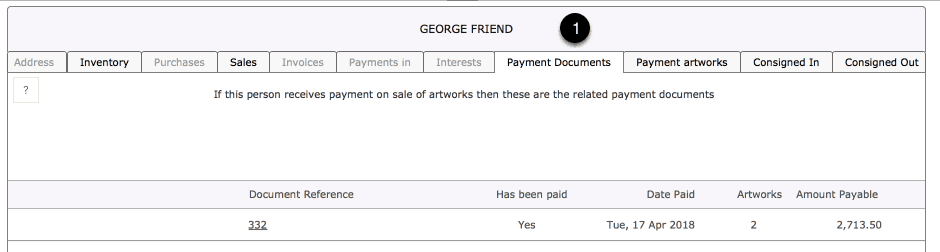
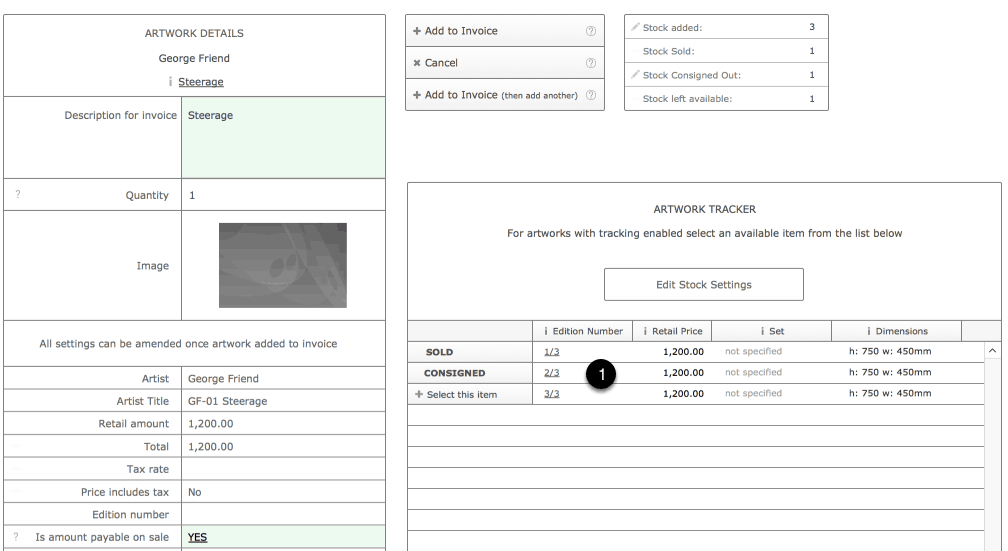
 Adding an unique item to an invoice

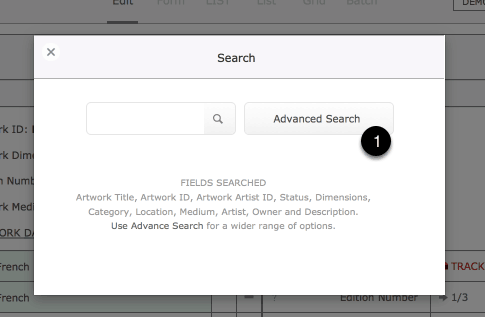
Search for and find an artwork to enter onto an invoice.

Now select the required item of stock

  1. Once you’ve selected to add an artwork that has the Tracker on you’ll see this screen and the Artwork Tracker where you select the item you want to enter onto the invoice. Items already sold or consigned cannot be added to an invoice. Confirm the edition number that will be used on the invoice is correct.

Entering item onto invoice continued

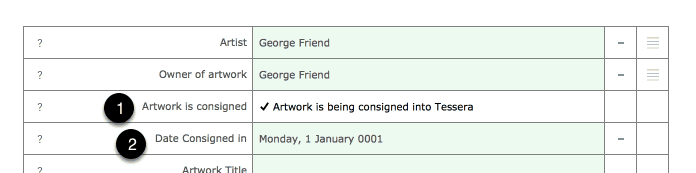
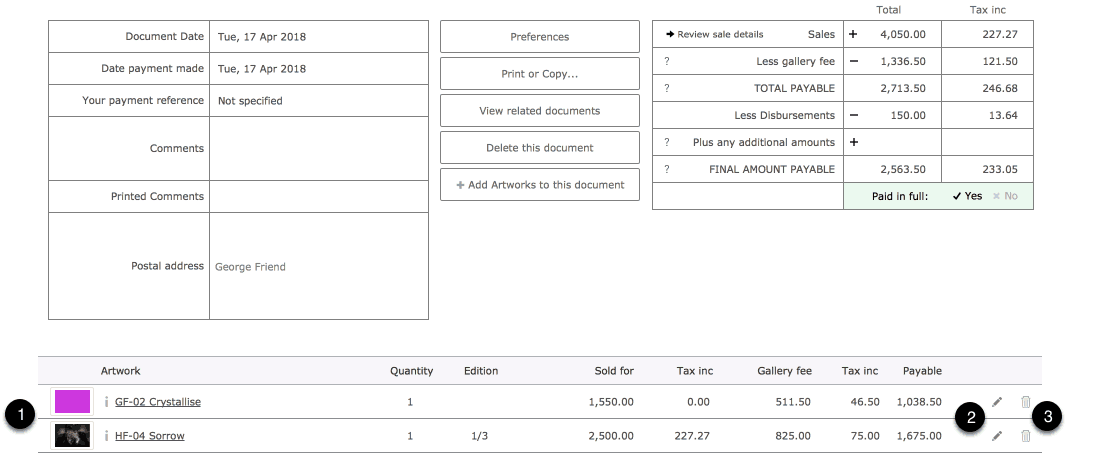
  1. Once entered onto an invoice the edition number is displayed along with the title of the artwork.

Click on an invoice line entry to review how the description of the artwork will appear on the invoice. Edit where required.

  1. The invoice description can include the edition number depending on your settings in Invoice Preferences. Here you can see the user has chosen to manually alter the entry as it will appear on the invoice.
  2. The original edition number of the artwork is displayed here as a reference.

NewImage


Tracker 2018-04-12T14:48:20+10:00

January 2015

Version 305 New Features

2015-01-20T05:35:17+11:00

Amendment and alterations to how the Custom fields are accessed and used throughout Tessera.

Users can now select custom fields by name when using them in templates for printing or when they want to include them on artwork details screens.

The Artwork View screen now allows the user to specify the details that appear on that screen.

The Collections feature has been expanded and improved so that users can view details on collections on most screens.


Version 305 New Features 2015-01-20T05:35:17+11:00

October 2014

Reports: Purchase Report

2018-04-19T13:41:35+10:00

When you enter artworks artwork component you enter the stock level and, where relevant, the amount you paid for the artwork.

The Purchase Report allows you to report on amounts spent purchasing artworks.

Recap on recording purchase amounts

The Stock Manager Screen is where purchase price details can be added.

  1. Use the Stock button to display all stock entered for the current artwork.
  2. Use the Edit button to edit the stock entry purchase pricing details.

Entering Purchase Amount

  1. Enter the Purchase Price for theis artwork along with any relevant tax rates and amounts.

Reporting on purchase amounts

  1. Access the Purchase Report from the Home Screen.

Purchase Report Features

  1. Control what artworks are displayed by entering a date range into the date filter.
  2. Select individual items for the option to return to the artwork to edit stock details.

Reports: Purchase Report 2018-04-19T13:41:35+10:00

Active Comments

2014-10-07T11:14:12+11:00

Active Comments

  1. Comments can be attached to PeopleArtwork and Invoice records. Comments can also be marked as requiring attention. If there are comments marked as requiring attention then the Manage Comments link on the Tessera Screen will be highlighted.

NewImage


Manage Comments

  1. Once on the Manage Comments Screen click on a Comment button to review the comment.
  2. From the popover you can toggle off the action required status which will remove this comment from this screen, edit the comment or choose to delete the comment altogether.

NewImage


Active Comments 2014-10-07T11:14:12+11:00

Labels in Tessera

2016-11-30T21:59:48+11:00

Producing and printing labels

To produce labels for artworks or client addresses first find the records you need and then select to export the result by selecting to Print the records then Exporting the records..

See the Export section of the Tessera help pages for more details.

Select to export the result as an Excel spreadsheet making sure you select to make the first row of the export the field names.

Once you have the result exported open MS Word and use the Mail-Merge feature to select label type and formatting or use one of many other programs available for producing labels.

Labels in Tessera 2016-11-30T21:59:48+11:00

June 2014

Payment Documents: Paying third parties on sale of artworks

2018-04-17T21:41:48+10:00

When artworks are created you can specify if payments are required to be made when they are sold. Usually this is when a gallery has sold an artwork on behalf of an artist or other party and a percentage of the sale now falls due. It may also occur if a royalty payment to an artist needs to be made.

Tessera can also manage artworks where there is more than one amount payable on sale of an artwork. See the pricing of artworks section to understand how more on how to specify amounts payable on artworks.

This help screen looks at how to settle amounts payable once an artwork has sold.

Recap on Payable Amounts

This is a look at how you got to the point where you need to draw up a Payment Documents.

  1. When you added a new artwork to Tessera you have the option of specifying if an amount is payable to a third party. This screenshot is from the pricing screen in the Artwork Component showing an example of an amount payable.

Editing Payable Amounts

  1. When an artwork is added to an invoice you have the opportunity to edit the details of the amount payable. (You can return to the invoice at any time to make alterations or add additional amounts payable). This screenshot is from the invoice component of Tessera where you’ve selected a line item that you’ve added to the invoice and this is where you access the features for specifying the amount payable.
  2. Options include…
  • Altering to whom the amount is to be paid.
  • Altering or deleting the amount payable.
  • Adding additional amounts payable to other payees.

Once artworks have been sold these are the steps you take to review and settle the amounts now payable.

Steps include: Creating a Payment Document and adding payable items.

  1. Access the Payables Screen via the Tessera Home Screen.

Amounts Payable: Main Screen

This screen is where new payment documents are created before you add the related sold artworks.

  1. Create new Payment Documents.
  2. Filter existing Payment Documents by artist/owner.
  3. A list of all existing Payment Documents with an option to hide documents that have been marked as paid in full.
  4. All artworks that has already been added to a Payment Document.
  5. Artworks, with amounts payable, that have yet to be added to a Payment Document..

Review amounts payable that have yet to be added to a Payment Document

Use the Artworks ready to be added tab to review amounts payable that have yet to be added to a Payment Document.

    1. Use the filter to restrict the artworks shown to the required payee.
    2. Use the print button to print the displayed artworks in a form suitable for review.
    3. On the left side of the screen are details of the artwork sale.
    4. Use Invoice details to review details of the related sale. (If you have sold this artwork manually rather than adding it to an invoice you have the option to return to the related artwork to make any required alterations to the sale details).
    5. On this side of the screen are the details concerning the amount now payable
    6. Use the Edit details button to review the details about the amount payable. You can edit these details including to whom it is to be paid, delete the amount payable altogether, or move directly to the original invoice to review all the original details

Creating a Payment Document and adding payable items

  1. From the Payment Documents, select New Payment Document and specify the person to whom the amount is payable.
  2. Click on the newly created document to access the Payment Document editing screen.

Payment Documents Edit Screen

Selecting a Payment Document takes you to the screen below.

    1. On the left hand side of the screen
      • Document date: The date of issue of this Payment Document.
      • Date payment made: For reference enter the date you paid this document.
      • Your Reference: Use your own system to give the document an unique reference.
      • Comments: Printed comments will be included on the printed document.
      • Postal Address: Will be included on the printed document.
    2. On the right hand of the screen are details regarding the amounts included on the document.
      • This includes the retail amounts the items sold for.
      • The amount retained by the gallery.
      • The total amount now payable to this payee.
      • Any disbursements/deductions to be deducted from the amount payable (Example: Framing)
      • Any extra payments to be made to this payee. (Example: Reimbursement for shipping).
      • Amount payable to the payee.
    3. Select to delete the payment document. (This will remove all items from the payment document and then delete the document).
    4. Use this button to add artworks, with amounts payable, to the payment document.
    5. Artworks as they’re added will be listed here.
    6. Once you’ve paid the artist or owner mark the Payment Document as paid.

Adding Artworks to a Payment Document

Use the Add Artworks to this document to access a screen that shows only those items available to be added to the current document.

Details

  1. The artwork details for amounts now payable for the current payee will be listed on this screen.
  2. The ID is included to ensure you are identifying the correct artwork.
  3. The total amount now payable to the payee.
  4. Use this button to show the amount outstanding on the invoice and other invoice details as well as details on the amount payable including the option to amend or delete the amount.
  5. Use this button to add this item to the payment document and remove it from this screen.

A Payment Document with artworks added

  1. The payable items have now been added to the payment document.
  2. Click on the edit button to review and amend the description and the amount now payable.
  3. Use the delete button to remove the item from the payment document.

Reviewing amounts payable elsewhere in Tessera

You can return to the Documents Payables screen in Tessera at any time to find the Payment Documents for a specific person and you can also review an individual’s payment documents from the People component of Tessera.

  1. Access the person’s Dashboard in the People Component and under the Payment Document tab you’ll find listed all Payment Documents including the amounts paid and when the payments were made. Clicking on a payment document’s ID will take you straight to the original document.

Payment Documents: Paying third parties on sale of artworks 2018-04-17T21:41:48+10:00