Collections are a way of grouping selections of artworks together. These can then be retrieved for printing or display purposes by searching in Artworks using the dedicated search features on the Artwork Advanced Search screen or from the Collections screen itself.
Artworks can be added to Collections from the Collections Screen or from any of the Artwork Component screens.
Collections vs Consignments
Collections
Collections allow you to create groups of artworks, whether or not those artworks have any stock available. You can add artworks to any number of Collections.
Examples
- Groups artworks for prospective clients
- Create separate Collections for themes in your collection such as portraits and landscapes
- Exhibition lists using the Collection feature lets you specify different prices for artworks then their listed retail price
Consignments
Consignments are used to specifically place artworks in your collection or gallery out to another venue. If artworks are not available then they cannot be placed out on consignment.
Examples
- Loan artworks from your collection to public institutions
- Place artworks from your gallery at art fairs
- Collectors can use consignment documents to place artworks at auction
- Artists can place artworks on consignment at a gallery
Using Artwork Collections
- Use the Home button then the Collections button.

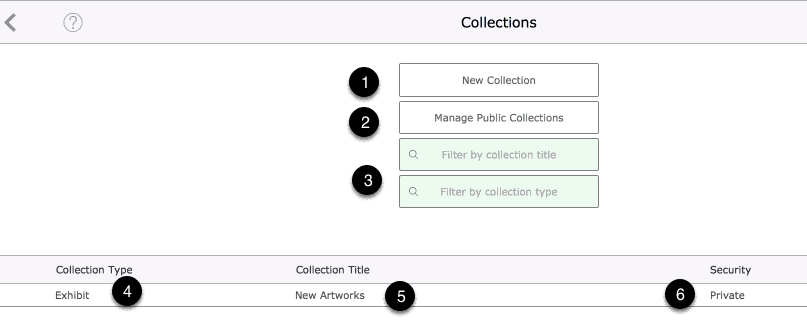
The Collections Screen
Where existing Collections are listed and new Collections are created.
- Create a new collection.
- Collections can be marked as Public. Public collections are designed to allow clients to view a collection without access to other components of Tessera. Use this button to enter the Public Collection screen.
- Use the filters to restrict the number of displayed Collections
- Access existing collections by clicking on the relevant Collections button,
- Collection Categories an be created and Collections can be added to these categories. This makes it easy to search and filter Collections into particular categories. This way you search and find all Collections that are exhibitions for example.
- Indicator showing if this Collection is private or public.
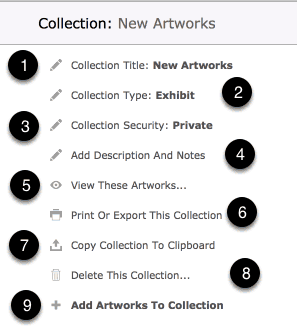
Individual Collection Management
- Give the Collection a suitable title.
- If need be assign the Collection to a Collection Category.
- Specify if this is a Private or a Public Collection. Public Collections are accessed from the Main Collections Screen and are designed to allow clients to access selected Collections for viewing purposes only.
- Add general comments.
- Leave this screen and view the artworks in the Artwork Component.
- Use the Artwork Print and Export screen with the artworks in this Collection.
- Copy the text details of this Collection to the Clipboard.
- Remove all artworks and then delete this Collection.
- Use this button to add any number of artworks to a Collection.
Collection Management Line Items
- Click here to open the Artwork Dashboard for this artwork.
- Entries can be given numbers most often used as Catalogue numbers when using a Collection as a way to create a catalogue of artworks. Collections are always sorted by this number.
- This field is automatically populated with the retail price but this can be altered to any value without effecting the original artwork retail price. This allows creation of collections to be used as catalogues of artworks where the price remains as a record of the price at the time of the catalogue creation.
- If required you can specify a quantity. This has ne effect on actual artwork stock levels.
- Use this button to access features that allow easy numbering of the number field.
- Remove this artwork collection entry.

Public Collections and Security
- Public collections are designed for clients to browse. Clients only have access to the public collections and need a password to exit the Public Collections Feature. Note: Security should be enabled in Tessera for this feature to work as expected.
Caution: If security is not enabled clients will be able to exit the public collections screen and access the other components of Tessera.
When Security is enabled you can open the Public Collections page and give your client access to your iPad or laptop or allow them to access Tessera as a guest. They will be able to browse the public Collections but will not be able to leave the Public Collection area without entering the current users password. Preventing them from access other areas of Tessera.
Public collections over the internet
If you’re hosting Tessera using FileMaker Pro Server then you can enable webdirect. This feature of FileMaker Pro Server allows a client using most browsers to access Tessera. With Security enabled in Tessera they will be able to log in to Tessera use the “Guest” button. The Guest button is enabled from within security. Using the Guest button takes the client to the Public Collections screen where they can browse the collections available as they would any webpage.
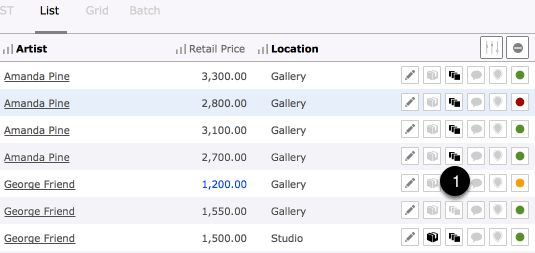
Accessing Collections from the Artwork Component
- From any of the Artwork Component Screen click on the Collection icon to open the Collection Screen. This icon is highlighted when the current artwork has been added to one or more Collections.
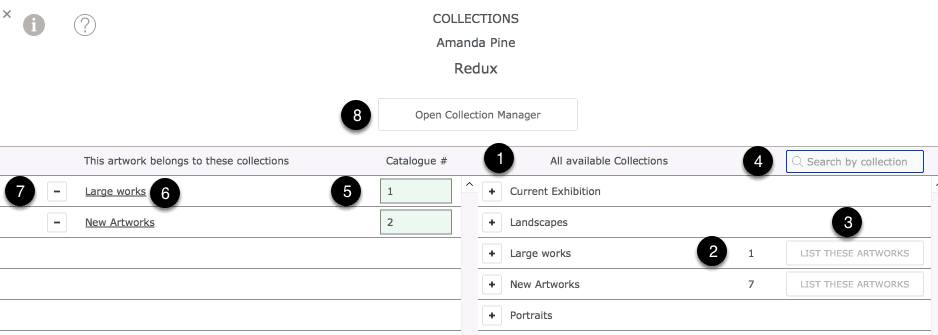
Artwork Dashboard Collections Screen
- Clicking on the Collection icon opens the Artwork Dashboard for the current artwork on the Collections Screen where all available Collections are listed.
- Number of artworks in this Collection.
- Use this button for the option to display all artworks in selected Collection on the Artwork Component List screen. This makes it an easy way to find and display artworks in a Collection.
- Search for Collections.
- Items in Collections can be numbered and numbers can be added and edited from this screen.
- Click on Collection title to review all artworks in Collection.
- Remove artwork from Collection.
- Open Collection Manager to create and manage Collections.